I'm also going to start attempting to design a website. I really have a hard time with designing things like websites. When I take a photo, I generally see what I want the end result to look like in my mind before I even take the picture and I can get a good approximate match in the camera, but when it comes to designing a website, I can stare blankly at the screen for hours thinking of all the fun things I'd rather be doing.
Thursday, July 14, 2011
And now, a word from our president.
I'm also going to start attempting to design a website. I really have a hard time with designing things like websites. When I take a photo, I generally see what I want the end result to look like in my mind before I even take the picture and I can get a good approximate match in the camera, but when it comes to designing a website, I can stare blankly at the screen for hours thinking of all the fun things I'd rather be doing.
Wednesday, July 13, 2011
Mission Statement - Part 2
So what brought on this whole mission statement thing all of the sudden? Don Giannatti of Lighting Essentials is starting a 52 week project for his readers to follow along to. This is the assignment for week one:
What do you want to do photographically? Tell us with a single paragraph what you want to be able to do with your images. Tell us what you do without telling us you are a photographer. Accompany that message with a single image taken around your home. Inside or out, make a photograph that adds insight into the mission statement you will be writing.
As for the photograph… think long and hard about it. It should reflect your mission statement as best as possible. It can be done indoors or outside. I only want you to to shoot around your house/apartment as an exercise in creativity. Sometimes we have to make do with what we have… and I want you to make do for an important photograph without leaving your yard. That is the extent of the rule.
So with a bit more thinking, I went on to try and finish my mission statement. I think this is it:
We bring imagination to life.
Through creative lighting and editing, Digital Room Studios strives to create the most fun and imaginative images goes above and beyond suiting a client's basic needs. We collaborate with our clients to provide a product that will melt their faces with awesomeness.
It's ok to have something about melting faces and awesomeness in the mission statement, right?
Mission Statement
"We bring imaginiation to life."
It's a start. That's the basic mission of Digital Room Studios. I want something special and imaginitive in all my products for my clients. I'll be doing an overhaul of the website and moving the galleries to private unlisted areas so that clients can have access to them. Site viewers and potential clients will just have a view of portfolio shots, so that they're not underwhelmed by some of the more mundane work I've done; shoots like events and edits.
Let There be Light!
So I'm 75% of the way to having all the lighting equipment I'll ever need until February. Through a fairly fortunate discovery, I found 5 Speedotron Blackline 202VF heads, 5 cables, a bunch of reflectors, and a 405 pack for $1200 from a studio in California. I also purchased an Innovatrix Tronix Explorer XT SE (now that's a mouthfull) to power this stuff on location.
All I really need now is more power packs. The 405 isn't quite strong enough for day time, so I'm eyeing two 1005 1000w/s power packs. That way I'll have 3 power packs and a total of 2400w/s as needed. I mean, 400w/s will be more than enough on some shoots.
My third concern, that I can remember anyways, is being able to carry all this stuff. It normally retails for about $330, but I found what appears to be a new one for $150. It is supposedly an excess purchase from a photographer in Bel Air. Hopefully they still have it and will sell it to me.
To know where you're going...
...you have to know where you come from. I think. Or who you are. Or something like that. If you get bored, try out this test based on the Myers-Briggs personality test. This one is about 72 questions that are all yes or no and there are no right or wrong answers.
I scored as an INTP. I always do. It's fate I guess.
A Beginner's Guide to Off Camera Lighting
I've recently started getting into using off camera lighting and learning about lighting in general. It's really stepped my game up 100%.
I started off with a strobist kit from Midwest Photo Exchange, after reading up on the strobist blog. For as little as $215, you can pick up a flash, light stand, umbrella, wireless triggers, and other goodies like light gels, DIY snoot kit, etc...
The knowledge is mostly free. The Strobist Blog has been the biggest inspiration in learning about lighting.
I also picked up Light Science and Magic, Third ed. at a local photography store for a bit cheaper than the list price. This is a book that describes the theory behind lighting certain scenes and objects and how to go about correcting problems you may have. It's not a guide on what setting you need for your camera and flash and how far away to place your lights. The authors' goal is to make it so you can do this on your own without having to memorize their diagrams and light setups.
Jumping back to the hardware; there's several different choices you have to make that will influence price, reliability, and which combination of gear you're going to be purchasing. The first thing to consider for off camera lighting is how you want to trigger your flash.
Sync Cords
You can go cheap and purchase a sync cord, which runs from your camera to your flash. The up side is reliability and cost. It should work every single time and not cost an arm and a leg. The down side is flexibility and range. Being tethered to your flash and only having a short range will not allow you to get certain shots and may have you tripping over your own cables if you're clumsy like me.
E-Bay Triggers
The cheapest wireless options are the "e-bay" triggers. The most popular are the Gadget Infinity, Cactus V2S wireless trigger system. Most of these can be had for about $30 a set. They come with one transmitter and one receiver. The down side of these are reliability, range, and possibly the batter depending on what brand you choose. Most will misfire. This is a fact and not opinion. They won't do it 100% of the time, but radio interference and being in a busy part of a city as opposed to away from a lot of interference can influence how many misfires occur. The stock range on these is about 100 ft., if I remember correctly and the battery on the Cactus triggers are a CR2. These can be expensive. They go for about $10 a piece at your local store, but can be had for less than $2.50 each if bought on line.
The one thing about the e-bay triggers are that you can mod them fairly easily and for $30, if you happen to break one, it’s no big deal. There’s two mods that a lot of people are doing to their Cactus triggers. The first is an antenna mod. It consist of opening the case of the transmitter and soldering a 433mhz antenna to the board, then drilling a hole and running it through the top of the case. This mod has been shown to increase reliability and range on the triggers. The second mod consist of soldering connections in the receiver for an external battery pack that takes AA batteries. This helps alleviate the cost of batteries for the triggers.
Elinchrom Skyports
The next set of triggers are the Skyports, made by Elinchrom. These are more expensive than the E-Bay triggers, running about $180-$190 a set. The transmitter and receivers are fairly small and by all reports, are very reliable an have a fairly long range. I have not used these, but everyone I know who has, really likes them. The transmitter that sits on the camera’s hot shoe has an internal rechargeable battery, like an iPod. The down side to this is that if you forget to charge your battery and get stuck at a shoot with no electrical outlets, then you’re SOL. The battery is supposed to last a long time though, so as long as you don’t forget, you’re golden. The other down side of the Skyports is that they currently will not work with the Vivitar 285HV, the flash sold in the MPEX Strobist kits. Elinchrom has already stated that they’re working on an updated version that should be out shortly that will work with the Vivitar flash.
Pocket Wizards
The last set of triggers that I’m going to talk about are the Pocket Wizards. They’re considered the best out there by most people. They have exemplary reliability and a range of up to 1600’ in perfect conditions (which we know, conditions are never perfect). The down side? $180-$190 for one transceiver, meaning about $360-$380 for a set. The up side? These devices are transceivers. They transmit and receive. You can use the same unit that you used on your camera to trigger a flash. They can also trigger your camera. They’re solidly constructed and so far have proven to be one of the best purchases I’ve made for my photo kit. If you’re serious about photography and have the money, don’t hesitate to buy these. If you don’t want to spend the money or don’t know how serious you are about learning about off camera lighting, then the other options listed above are perfectly fine.
Now I’m going to discuss the next important part of putting together a kit for off camera lighting; the flash.
There’s really two main types of flashes to consider, a fully manual flash, or a flash with TTL capabilities. Keep in mind, that in most circumstances, once a flash is removed from a camera and fired via a radio trigger, that the flash loses all TTL capability. Regardless of which way you go, you want to make sure that your flash can operate in full manual mode. Having a TTL flash that will not operate manually will not let you use it with radio triggers.
The pluses of TTL flashes are that they can be used on camera. If you ever need a flash to just shoot with, you can pop it on your hot shoe and you’re good to go. Something like the Canon 580 EX II or the Nikon SB-800 will let you use it as a normal on camera speed light or as a manually triggered off camera flash. The down side to the TTL flashes are that they’re normally more expensive. You also have to make sure that the flash has a way to be triggered by your triggers. The Cactus triggers work via hot shoe so will work with most flashes, while the Skyports and PW’s use a cable. A flash like the Canon 430EX does not have a sync port, so would require a miniphone to hot shoe cable to work.
The next type of flash is the full manual flashes. These are flashes that operate manually and do not have TTL control. They’re usually a lot cheaper, with most running under $100 for one. The down side to these flashes is that once you put them on your cameras hot shoe, you still have to manually set the power and focal length on the flash and they won’t interact with your camera like a typical TTL flash. If you’re planning on really getting into off camera lighting though, these flashes are a good buy, as most the time they’ll be spending off camera and connected to a radio trigger, which means even a TTL flash would be operated manually.
That’s it for now. I’ll probably get around to adding more later, but my fingers are tired…
Links:
The Strobist Blog
Midwest Photoexchange Strobist info/kits
Light Science and Magic 3rd Ed.
Gadget Infinitry - maker of the Cactus V2S wireless triggers.
Pocket Wizards
Elinchrom - maker of the skyport wireless triggers.
The Insignificant, Cheap Flash Mod
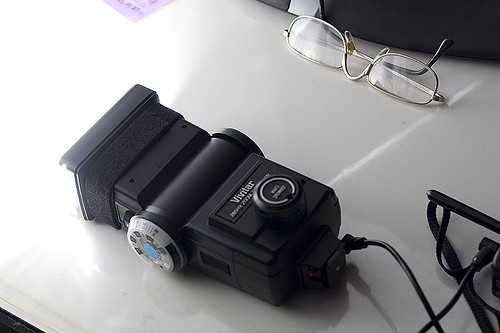
While browsing the strobist discussion group on Flickr the other day, I ran across a post detailing a velcro strap that a company was selling for $10 each. I knew I had seen them some where before, but for much less money and then it hit me, the velcro straps we use at work to bundle network cables and cables that clutter people's work areas up. So here's my take on it.
Ok, this is real complicated. Get out your paper and pencil and prepare to write a diagram. First you cut a strap of velcro the appropriate length to securely fasten around the head of your flash. Next, you wrap it around the head of the flash and fasten it. Got that? Good. We're done here.
My flash is one of the Vivitar 285HV variety. It has a rather large lip around the flash head. I do for see a possible problem with other flashes if the velcro isn't strapped tightly. Since there's no adhesive backing, it looks like it may slide off if a person isn't careful with it. I believe that the velcro I used it 3/4 of an inch, so it fits on the Vivitar perfectly.
Now all I have to do is attach velcro to the gels so I can use them.
No Photographers Allowed

So the hands of beuracracy and paranoia are at it again. If you notice the picture to the left you'll see the monument that was built to honor our first president. The one who helped to establish this country that was founded on the principals of democracy and freedom.
Of course, as time have changed so have our ideas and our fears. Today it's nearly impossible for a person with a camera not to get a dirty look or two from some one that thinks they're a pervert that wants pictures of little kids. It's hard not to get stopped in public and harrassed by the authorities; hald the time those authorities are all for violating your rights if you don't know them and don't stand up for yourself.
I know this may sound like nay saying to some, but it can be the truth. We engage in this hobby we all love and we're proud of it. We're not some pedophile or terrorist slinking around in the shadows trying to plan our next victim or target. We're people who like capturing the essence of a moment in time in pictures and sharing it with the rest of the world.
I'm not going to go too long on this rant, but I'll leave everyone with some helpful links that they should visit. And on a parting note, if you ever get stopped and harrassed, remember that you have rights too.
Bert P. Krages II Attorney At Law Photographer's Right PDF
DC Photo Rights - Flickr Group
"The War on Photographers" - PopPhoto.com article
Just Google Photographer's Right's and you'll come up with a ton of material to look through. Have fun, stay safe, and stay out of jail.
A Beginner's Guide to Manual Mode
Something that I hear a lot from new users is that they’re going to stick to the green box mode until they learn enough to operate the manual settings. This is something I disagree with and think that all new users should experiment with their DLSRs manual settings as most shutters are rated by manufactures to last at least 50,000 actuations and you can always chimp and erase; there’s no worries about wasting film and you can see the results immediately.
What should I know about the big M?
There are several very important things that a photographer must know about. I won’t cover this in depth in this tutorial as the discussion and arguments that can arise from the topics can be rather lengthy. Since this is the case, I’m only going to touch on them separately before attempting to explain how they relate to each other when controlling each parameter individually.
Exposure
In photography, exposure is the total amount of light allowed to fall on the photographic medium (photographic film or image sensor) during the process of taking a photograph
-Wikipedia
The exposure is what controls how light or dark a photograph is. The longer the exposure to light, the brighter the photograph; the lesser the medium is exposed (in this case the camera’s sensor), the darker the photograph.
ISO
The first one is ISO. It directly affects the pictures you take and the exposures that crop up from the rest of the settings. ISO stands for International Organization for Standardization ( http://photonotes.org/cgi-bin/search.pl?input=iso&which=d ). The ISO was originally for film speed and dictated the sensitivity to light that a film had, with the lower the number being the slowest and the higher being the fastest. The lower ISO rated film also contained less grain and would yield better quality pictures.
Most entry level DSLRs have an ISO setting that ranges from 100-1600, with higher end models going as high as 6400 ISO. Several different models contain auto ISO settings and can adjust this on the fly. I prefer to do it myself. The ISO setting works like the film ratings, but can be changed in camera. The lower the ISO setting, the faster your shutter speed will have to be to compensate for the slow film like effect. Also, the lower the ISO setting is at, the lesser the amount of grain that will be evident in the photos, yielding a better quality picture. On the other hand, a higher ISO setting emulates faster film allowing you to get brighter exposures with a slower shutter speed. Using a faster ISO setting will create grain in the photo though, with sometimes extreme amounts at higher ISO. The grain will be more noticeable in areas of the photo that are black and underexposed.
So when setting your ISO, you’ll want to use higher settings for darker atmospheres where you can’t use a faster shutter speed, but balance it out so that your photos don’t turn out too grainy. In doors and around low ambient light, I usually try and go no higher than ISO 800 unless I have to.
Shutter Speed
Shutter speed’s basic definition is pretty straight forward. It’s the duration of time in which the shutter remains open. Having a slower shutter speed will allow more light in for a brighter exposure; having a faster shutter speed will let less light in and will create a darker exposure. The duration of a shutter speed will also affect blur from camera shake and the motion of a subject. If you’re photographing a moving subject and have a slow enough shutter speed, you will get a photo of the subject from the point when the shutter first opens to the point when it closes. This can create some neat effects, but is usually not the desired result of taking a photo. Also, a slower shutter speed while hand holding a camera can cause everything to appear blurry from the inability of a human hand to hold the camera perfectly still.
Usually the guideline for the slowest shutter speed allowed when hand holding a camera is 1/focal length. So if you’re using a 50mm lens, 1/50 is generally accepted as the slowest shutter speed possible before camera shake starts to become an issue.
Aperture
Aperture is the hole or opening through which light is admitted. In our lenses, it’s the set of blades that can be adjusted to allow light through. Aperture does many things, like controlling the DOF (Depth Of Field) as well as the exposure. The number of blades can also shape the way the out of focus area looks when using a shallow DOF. Apertures can range from 1.0 to 32. They are designated by a f/(aperture number). The lower the aperture equals the wider it can open and let light in. This also causes a shallow DOF as it uses the whole lens as opposed to just a portion of the center. Generally lenses with a larger maximum aperture (lower number) cost quite a bit more than those with smaller maximum apertures.
The Light Meter
All new DSLRs should have a light meter. It should be viewable in the bottom part of the viewfinder. When pressing half way down on the shutter button to focus, the meter should come up with a tick above it, indicating the exposure that the camera is reading. Most entry level cameras will just take a general reading where the higher level models will let you set which part of the view finder you wish to meter off of. The meter should have three numbers, a 0, a 1, and a 2. Those usually have two ticks between them. Each number is a full stop of exposure. There will be a -1 and a +1 as well as a -2 and a +2. This means that if the tick telling the exposure is hovering above the -1, that the photograph will be underexposed by one stop; +1 means that the photograph will be overexposed by one stop.
Using This All Together
Now with the little bit of information provided, you should be ready to start experimenting with the manual control on your camera.
With your ISO set at an appropriate range (outdoors should be ISO 100 and indoors about ISO 640) you want to set you aperture. Generally speaking, 5.6 is a good aperture that will allow you to take a photo of a subject without having too shallow of a DOF and will let you have the majority of it in focus. While having your camera pointed at the subject, press the shutter button half way down. The light meter should appear with the tick telling you what the exposure should be hovering somewhere above. If it’s to the left, over the negative numbers, it means that the current reading shows as under exposed and the shutter speed needs to be lowered to compensate. Conversely, if it’s hanging over the positive numbers, the reading is that the photograph will be overexposed and the shutter speed needs to be faster to compensate.
When the shutter speed is set correctly, the tick on the meter should hover over the center, which should a zero. This meter reading is showing that if you take the current picture, it will be properly exposed for the ISO and aperture settings you use.
If you’re indoors and your shutter speed drops below the generally accepted minimum, you can either raise the ISO or widen the aperture. Keep in mind that some cameras will produce considerable amounts of grain at higher ISO’s and too wide of an aperture can cause a very shallow DOF, which can be a cool effect, but can also provide the undesired characteristic of having focus placed on the wrong area of the photograph.
In conclusion, this little bit of information should be enough to get most beginners on their way to using the manual mode of their camera. The manual mode offers greater control over your photos and unlike the Green Box mode on many cameras, will allow the user to start delving into the world of the RAW file format. That, is a whole ‘nother ballgame there and will be covered in a future tutorial. Until then, don’t be afraid to experiment with your camera’s manual mode and have fun doing it.
Subscribe to:
Posts (Atom)
